


Windshield Wiper Motor Reset Adjustment Guide
Wiper motor reset adjustment method: prepare the wrench, first use the wrench to remove the screw of the wiper brush, then press the wiper switch, and then close the switch, after the wiper arm is installed, you can reset the wiper motor, and then start the wiper open to see the effect
LEILI
Hower Yang
6/13/20252 min read
Windshield Wiper Motor Reset Adjustment Guide
1. Core Methods of Wiper Motor Reset
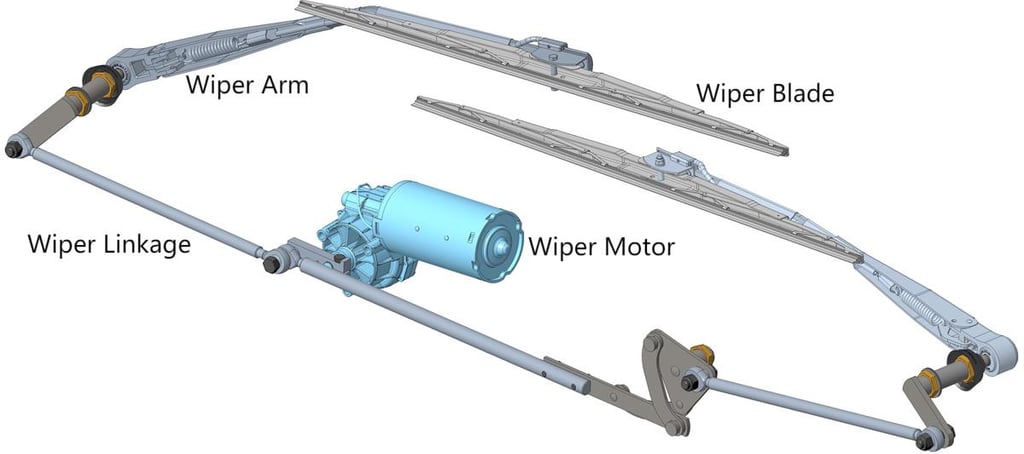
The reset adjustment of windshield wiper motor fundamentally relies on mechanical position adjustment via power-off or execution of reset programs, ensuring the wiper arm accurately parks at the bottom of the windshield. Operational logic across vehicle models follows the standard process: power-off positioning → mechanical calibration → test verification, categorized into automatic reset and manual mechanical adjustment.
2. Automatic Reset Operation Steps (for mainstream models)
(1) Reset Switch/Program Method
Step 1: Turn off the wiper and disconnect the vehicle power supply.
Step 2: Long-press the reset button on the wiper control lever (some models require powering on to ACC gear first).
Step 3: Observe if the wiper arm automatically parks at the bottom edge of the windshield (the parking position should be parallel to the glass bottom).
(2) Power-Off Reset Method (for models with intermittent gear)
Step 1: Turn the key to ACC gear and set the wiper to the intermittent gear.
Step 2: When the wiper runs to the lowest point (nearest to the glass bottom), immediately cut off the power.
Step 3: Adjust the wiper arm to the ideal position and tighten the fixing screw (torque reference: 8-12N·m as per the vehicle manual).
3. Manual Mechanical Adjustment (for old models like Buick GL8)
(1) Reset Mechanism Clearance Calibration
Disassembly: Remove the connecting bolt between the wiper arm and motor to expose the turntable assembly.
Clearance standard: Check the clearance between the turntable spring plate and the stop baffle, which should be maintained at 4-8mm:
Clearance >8mm: Prone to wiper scraping the glass frame.
Clearance <4mm: Inadequate wiping coverage.
(2) Motor Shaft Positioning Calibration
Step 1: Loosen the shaft fixing screw (mark the initial position).
Step 2: Manually rotate the motor shaft to the stop position (judge the reset contact closure by the "click" sound).
Step 3: Reinstall the wiper arm and test the wiping trajectory (required to cover over 90% of the glass without touching the frame).
4. Common Faults and Solutions
(1) Wiper Stops Midway
Fault Symptom: After turning off the wiper, the wiper arm fails to park at the bottom of the windshield and stops in the middle.
Solution: Inspect the reset contacts of the wiper motor for oxidation (if the contact surface shows black rust or dirt). Gently polish the contact points with fine-grit sandpaper to remove oxides and restore conductivity.
(2) Intermittent Non-Parking
Fault Symptom: The wiper occasionally fails to park automatically, or delays/catches during parking.
Solution: Disassemble the turntable assembly of the wiper motor, adjust the spring adjusting nut clockwise to enhance tension (each adjustment should not exceed 1/4 turn). If the spring is aged or deformed, replace it with a new reset spring (recommended to use original-specification parts).
(3) Wiping Angle Offset After Reset
Fault Symptom: After reset, the wiping trajectory is not parallel to the glass edge, showing upward or downward tilting.
Solution: Loosen the fixing screw of the wiper arm, use an angle gauge to calibrate the parallelism between the wiper arm and the glass bottom edge (standard angle: 0°). Retighten the screw and test the wiping trajectory (recommend repeating calibration 2-3 times for accuracy).